Adobe InDesign is a powerful page layout program renowned for its ease of use, precision, and integration with other applications in the Adobe Creative Suite. Hallmark features of InDesign include professional type and graphics handling, drawing tools, transparency, and reliable print and PDF output. With powerful creative tools and flexible workflow features at their fingertips, graphic designers around the globe are using InDesign to produce all types of print and electronic publications. From magazines, books, and newsletters to posters, CD covers, and bumper stickers, many of the publications you see are produced with InDesignoften in concert with Adobe Photoshop and Adobe Illustrator.
As you work on a publication, you'll probably print several proofs to one or more desktop printers before the publication is completed. After you've added the final touches and the publication is ready for final output, you or your print service provider will print the finished document, probably using a high-resolution printer. If you're producing a color publication that will be printed on a printing press, final output means printing color separations that will be used to print the document on-press.
In this tutorial, you'll learn how to preview color separations onscreen, how to export documents as PDF.
How to preview color separations onscreen
InDesign includes several features that let you preview and prepare documents before you print final versions or send them to a print service provider for high-resolution output. The Separations Preview palette (Window > Output > Separations Preview) is one of the most useful production tools for color publications. It lets you show or hide individual colors, display color values for objects and graphics, and show areas that exceed a specified maximum ink coverage.
To preview color separations onscreen, open the Separations preview palette and then choose Separations from the View menu. The color list in the palette includes process colorscyan, magenta, yellow, and black, as well as any other spot colors in the Swatches palette regardless of whether you've used them.

Separations Preview Palette
Clicking the small square to the left of a color name alternately shows and hides the color. Clicking CMYK shows and hides all process colors. You can show or hide whatever colors you want, although at least one color must always be displayed. The Show Single Plates in Black command in the Separations Preview palette menu lets you control how a color is displayed when all other colors are hidden. When it's checked, single colors are displayed as black.
As you drag the pointer over a page, the values associated with the colors in the Separations Preview palette change to reflect the color of the pixel that the pointer is over.
Because too much ink on a page can cause drying problems, you may also need to know if the colors in a layout exceed the maximum ink coverage value suggested by your print service provider. To highlight areas that exceed maximum ink coverage, choose Ink Limits in the palette menu, and then specify a maximum ink coverage value in the accompanying field. (Check with your print service provider for the suggested percentage.) Areas that exceed the specified maximum ink coverage value are displayed in shades of red. The more an area exceeds the maximum allowable ink coverage, the darker the shade of red.
When you're done previewing separations and areas that exceed maximum ink coverage, choose Off from the Separations Preview palette menu to return to normal view.
How to exporting documents as PDF
At many publishing sites, publications in progress are exported as PDF documents for electronic markup and review, and finished publications are exported as PDF for final, high-resolution output. When it's time to export an InDesign layout as a PDF file, you have many options for controlling the size and many other characteristics of the file. The choices you make when you export a PDF file depend on how the PDF will be used. For example, if you want to distribute a PDF via email to colleagues or clients for electronic review and markup using Acrobat or Reader, you should save a compact, low-resolution PDF that's ideal for electronic distribution and review but not appropriate for high-resolution output. If you intend to send a PDF file to a print service provider for high-resolution output, you should save a high-resolution file.
To export a layout as PDF:
- Choose File > Export.
- In the Export dialog box, enter a name for the PDF file and choose the folder in which the file will be saved.
- Choose Adobe PDF from the Format menu (Mac OS) or Save as Type menu (Windows), and then click Save.
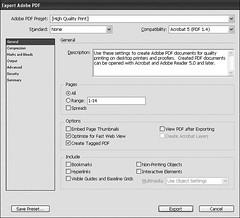
- At this point, you can simply choose a PDF preset in the Adobe PDF Preset menu, and then click Export, or you can choose a preset, customize the settings in the various panels of the Export Adobe PDF dialog box and then click Export. If you change a setting, "(modified)" is displayed to the right of the preset selected in the Adobe PDF Preset menu.

Export Adobe PDF Dialog Box
When you make changes in the Export Adobe PDF dialog box. they're saved with the application and used the next time you export a layout as PDF.
One of the main advantages of page layout software is that it lets you view publications onscreen before you print them. However, displaying a publication onscreen and printing it are very different processes. InDesign includes several features for troubleshooting potential printing problems before they occur, as well as an abundance of print-related controls that help ensure you get the results you want when you print a document.


