Thursday, May 31, 2007

Creating Basic Shapes in Illustrator CS3

Creating basic shapes

You'll begin this totorial by creating a new document and setting the ruler units to inches, displaying a grid to use as a guideline for drawing, and closing the panels that you won't use.

1. Choose File > New to open a new, untitled document. Choose Print from the New Document Profile menu and change the units to inches. Leave the rest of the settings as they are, and click OK.

2. Choose File > Save As, name the file Pencil.ai, Leave the type of file format set to Adobe Illustrator Document, and click Save. In the Illustrator Options, leave the default settings unchanged and click OK.

3. Reset the workspace by choosing Window > Workspace > [Basic].

4. Choose View > Show Grid to display a grid that's useful for measuring, drawing, and aligning shapes. This grid won't print with the artwork.

5. Choose View > Show Rulers, or hold down Ctrl+R (Windows) or Command+R (Mac OS) to display rulers along the top and left side of the window if they are not already showing. The ruler units are inches because of the change you made in the New Document dialog box.

You can change the ruler units of measure used for all documents or for only the current document. The ruler unit of measure applies to measuring objects, moving and transforming objects, setting grid and guide spacing, and creating ellipses and rectangles. It does not affect the units in the Character, Paragraph, and Stroke panels. These are controlled by the options in the Units & Display Performance dialog box in the program preferences.

6. To change options such as artboard size and units after a document is created, choose File > Document Setup.

Using basic shape tools

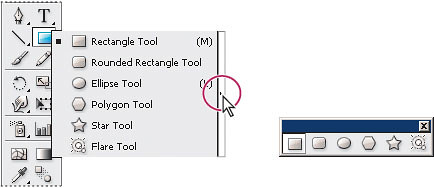
you'll create a simple logo using the basic shape tools. The shape tools are organized under the Rectangle tool. You can tear this group off the Tools panel to display it as a separate free-floating panel.

1. Hold down the mouse button on the Rectangle tool until a group of tools appears, and then drag to the tear-off triangle at the end and release the mouse button.

Tearing off the Rectangle tool group.

Using basic shape tools

2. Move the Rectangle tool group away from the Tools panel.

AddThis Social Bookmark Button

Illustrator CS3 Selection Tool

In this tutorial, you will learn how to correctly locate and select objects using the Selection tools, as well as how to protect others by hiding and locking them.

Using the Selection tool

1. Select the Selection tool in the Tools panel. Position the cursor over the different shapes without clicking. Note the icon that appears as you pass over objects, indicating that there is an object that can be selected under the pointer. Click the black airplane in the upper left corner. A bounding box with eight handles appears.

The bounding box.

 Illustrator CS3 Selection Tool

The bounding box is used for transformations such as resizing and rotating; it also indicates that this item is selected and ready to be edited. This could mean changing its size, color, position, or any number of other things. The color of the bounding box also indicates which layer the object is on "Working with layers."

2. Using the Selection tool, click the airplane to the right and notice that the first airplane is now deselected and only the second airplane is selected.

3. Add another airplane to the selection by holding down the Shift key and clicking the first airplane. Both airplanes are now selected.

Add other items to a selection by holding down the Shift key.

Illustrator CS3 Selection Tool 

4. Reposition the airplanes anywhere on the document by clicking in the center of either selected airplane and dragging. Since both are selected, they travel together.

5. Deselect the airplanes by clicking the artboard where there are no objects. If you prefer, choose Select > Deselect.

6. Revert to the last saved version of the document by pressing the F12 key or choose File > Revert. In the Revert dialog box, click Revert.


AddThis Social Bookmark Button

Wednesday, May 30, 2007

How to Changing the view of artwork in Illustratool CS3

You can reduce or enlarge the view of artwork at any magnification level from 3.13% to 6400%. Adobe Illustrator displays the percentage of the artwork's actual size in the title bar, next to the filename, and at the lower-left corner of the document window. Using any of the viewing tools and commands affects only the display of the artwork, not the actual size of the artwork.

Using the view commands

To enlarge or reduce the view of artwork using the View menu, do one of the following:

  • Choose View > Zoom In to enlarge the display of the Flowers.ai artwork.
  • Choose View > Zoom Out to reduce the view of the Flowers.ai artwork.

Each time you choose a Zoom command, the view of the artwork is resized to the closest zoom preset level. The preset zoom levels appear at the lower left corner of the window in a menu, indicated by a down arrow next to the percentage.

You can also use the View menu to fit the artwork to your screen, or to view it at actual size.

1. Choose View > Fit in Window. A reduced view of the entire document is displayed in the window. A helpful keyboard command for this view is Ctrl+0 (zero) (Windows) or Command+0 (Mac OS).

2. To display artwork at actual size, choose View > Actual Size. The artwork is displayed at 100%. The actual size of your artwork determines how much of it can be viewed on-screen at 100%.

3. Choose View > Fit in Window before continuing to the next section.

Using the Zoom tool

In addition to the View commands, you can use the Zoom tool to magnify and reduce the view of artwork. Use the View menu to select predefined magnification levels or to fit your artwork inside the document window.

1. Click the Zoom tool in the Tools panel to select the tool, and move the cursor into the document window. Notice that a plus sign (+) appears at the center of the Zoom tool.

2. Position the Zoom tool in the upper-left corner of the blue and orange flower and click once. The artwork is displayed at a higher magnification.

3. Click two more times on the blue and orange flower . The view is increased again, and you'll notice that the area you clicked is magnified. Next you'll reduce the view of the artwork.

4. With the Zoom tool still selected, position the pointer over the blue and orange flower and hold down Alt (Windows) or Option (Mac OS). A minus sign (-) appears at the center of the Zoom tool.

5. With the Alt/Option key still pressed, click the artwork twice. The view of the artwork is reduced.

For a more controlled zoom, you can drag a marquee around a specific area of your artwork. This magnifies just the selected area.

6. With the Zoom tool still selected, hold down the mouse button and drag over the area of the illustration you want to magnify; watch as a marquee appears around the area you are dragging, then release the mouse button. The area that was included in the marqueed area is now enlarged to fit the size of the document window.

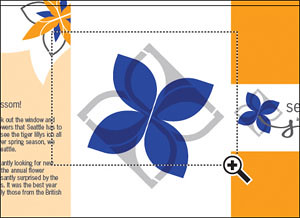
7. Choose View > Fit in Window before proceeding. Drag a marquee around the large blue flower in the center of the document window.

The percentage at which the area is magnified is determined by the size of the marquee you draw with the Zoom tool—the smaller the marquee, the higher the level of magnification.

Area selected with marquee.
Resulting view.

You can also use the Zoom tool to return to a 100% view of your artwork, regardless of the current magnification level.

8. Double-click the Zoom tool in the Tools panel to return to a 100% view.

Because the Zoom tool is used frequently during the editing process to enlarge and reduce the view of artwork, you can select it from the keyboard at any time without deselecting any other tool you may be using.

9. Before selecting the Zoom tool from the keyboard, select any other tool in the Tools panel and move the cursor into the document window.

10. Now hold down Ctrl+spacebar (Windows) or Command+spacebar (Mac OS) to use the Zoom tool without actually choosing that tool. Click or drag to zoom in on any area of the artwork, and then release the keys.

11. To zoom out using the keyboard, hold down Ctrl+Alt+spacebar (Windows) or Command+Option+spacebar (Mac OS). Click the desired area to reduce the view of the artwork, and then release the keys.

12. Double-click the Zoom tool in the Tools panel to return to a 100% view of your artwork.

Scrolling through a document

You use the Hand tool to scroll to different areas of a document. Using the Hand tool allows you to push the document around much like you would a piece of paper on your desk.

1. Click the Hand tool in the Tools panel.

2. Drag downward in the document window. As you drag, the artwork moves with the hand.

As with the Zoom tool, you can select the Hand tool with a keyboard shortcut without deselecting the active tool.

3. Click any other tool except the Type tool in the Tools panel and move the pointer into the document window.

4. Hold down the spacebar to select the Hand tool from the keyboard, and then drag to bring the artwork back into view.

You can also use the Hand tool as a shortcut to fit all the artwork in the window.

5. Double-click the Hand tool to fit the document in the window.

Using the Navigator panel

The Navigator panel lets you scroll through a document. This is useful when you need to see the entire illustration in one window and edit it in a zoomed-in view.

1. Choose Window > Navigator to open the Navigator panel. It will be floating in the workspace.

2. In the Navigator panel, drag the slider to the right to approximately 200% to magnify the view of the document. As you drag the slider to increase the level of magnification, the red outline in the Navigator window becomes smaller, showing the area of the document that is being magnified.

Drag the slider to 150%.
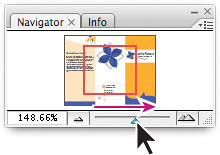
150% view of image.

3. Position the pointer inside the Navigator window. The pointer becomes a hand.

4. Drag the hand in the Proxy Preview Area (the red box) of the Navigator panel to scroll to different parts of the artwork.

Drag the zoom window.
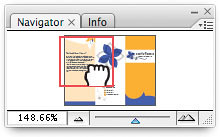
View of image after dragging.

5. With the pointer (hand) still positioned in the Navigator panel, hold down on the Ctrl (Windows) or Command (Mac OS) key. When the hand changes to a magnifier, drag a marquee over an area of the artwork. The smaller the marquee you draw, the greater the magnification level in the document window.

6. Close the Navigator panel.

Using Illustrator Help

For complete information about using panels and tools, you can use Illustrator Help. Illustrator Help includes keyboard shortcuts and additional information.

Illustrator Help is easy to use because you can look for topics in these different ways:

  • Scanning a table of contents.
  • Searching for keywords or phrases.
  • Using an index.
  • Jumping from topic to topic using related topic links.

Displaying the Help contents

First you'll look for a topic using the Contents screen.

1. To display the Help Contents menu, choose Help > Illustrator Help, or press F1.

2. Drag the scroll bar, or click the arrows, to navigate through the contents. The contents are organized in a hierarchy of topics, much like the chapters of a book.

Illustrator Help Contents screen.
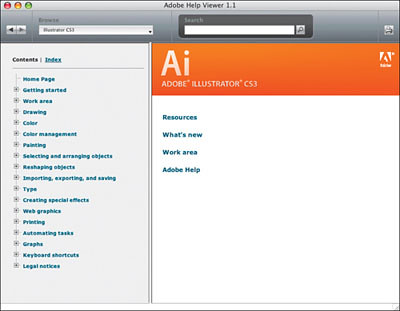
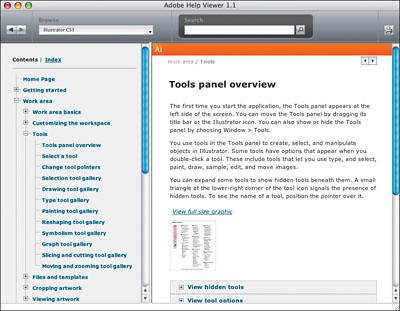
3. If the Contents link on the left is not selected, click it, and click the plus sign to the left of Work area. The plus + turns into a minus -, revealing topics to the Adobe Illustrator CS3 work area.

4. Click the plus sign to the left of Tools. A sub-menu appears.

5. Locate the topic "Tools panel overview" and click to display it. An illustration of the Tools panel appears along with its tool tip.
Using keywords, links, and the index

If you can't find the topic you want to review by viewing the Contents page, you can try using Search. You can search using keywords or phrases.

1. In the Search field at the top of the Help Viewer, type Brushes. Click the Search button to go to that topic. A list appears of the items containing information about brushes.

2. Click "Create or modify brushes" to learn about creating brushes. Notice, under Related Information, that there are several subtopics available for further research.

3. Click Create a brush to read about creating different kinds of brushes.

Locating a topic using the index

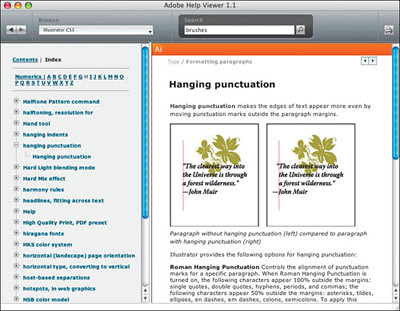
1. Click the Index tab in the left column to go to an alphabetical listing of topics. You will see an alphabet.

2. Click the letter H to get a listing of all the topics starting with H.

3. Click "hanging punctuation" to reveal a hanging punctuation sub category. Click the subtopic "hanging punctuation" to see how to create this text formatting attribute.

Click Index for alphabet, then click a letter for topics.
4. When you are finished investigating Illustrator Help, close the window and return to the document window.
AddThis Social Bookmark Button

Tuesday, May 29, 2007

The Adobe Illustrator CS3 Tools Part 2

The Control panel

The Control panel (Window > Control) offers quick access to options, commands, and other panels related to the current page item or objects you select (this is called context-sensitive). By default, the Control panel is docked at the top of the application window (Windows) or screen (Mac OS); however, you can dock it to the bottom of the application window (Windows) or screen (Mac OS), float it, or hide it altogether. When text in the Control panel is blue and underlined, you can click the text to display a related panel. For example, click the word Stroke to display the Stroke panel.

1. Take a look at the Control panel located below the menus. With the Selection tool, click the middle of orange/blue flower at the top, left of the page. Notice the Control panel information. "Group" appears on the left side of the Control panel as well as the Stroke, Style, Opacity, etc. of that group of objects. Choose Select > Deselect so the group is no longer selected.

2. With any tool, click the light gray bar on the left side of the Control panel, hold down and drag into the workspace. A vertical bar should be visible on the left side of the Control panel for you to move it. The Control panel can be docked on the top of the workspace again or at the bottom of the workspace or float freely.

3. Click the left side of the Control panel (the gripper bar) and drag it back to the top of the workspace below the menus. A blue line will appear telling you that it will be docked when you let go.

Working with panels

Panels give you quick access to many of Illustrator's tools, which make modifying artwork easier. By default, some of the panels are docked and appear as icons on the right side of the workspace.

1. Choose Window > Workspace > [Basic] to reset the panels to their original location.

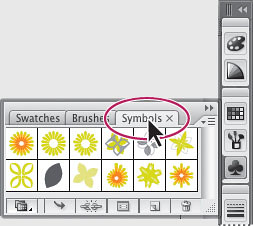
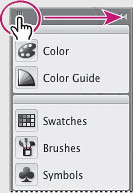
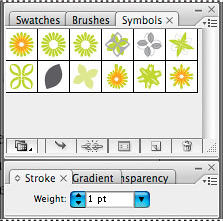
2. Click the Swatches panel icon () to expand the panel, or choose Window > Swatches. Notice how the Swatches panel appears with two other panels (Brushes and Symbols). They are all part of a panel group. Click the Symbols panel tab to expand the Symbols panel. Try clicking other panel icons like the Color panel (). Notice how a new group appears, closing the group that contained the Swatches panel.
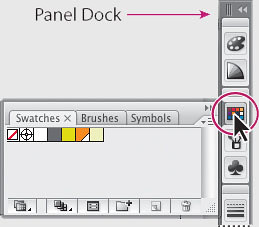
Click the Swatches icon to show the Swatches panel.

Click the Symbols tab to show the Symbols panel.

3. Click the Symbols panel tab (or whichever panel is showing) to collapse the panel back to its icon.

4. Click the double arrow at the top of the dock to expand the panels. Click the double arrow to collapse the panels again.

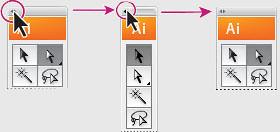
5. To change the width of all the panels in a dock, drag the gripper () at the top of the dock to the left until text appears. To undo what you just did, click the gripper () again and drag to the right until you can drag no further.

Click and drag to change the width.

Click and drag back to put it back.

The result.

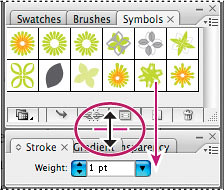
6. Choose Window > Workspace > [Panel] to expand the panels. You are now going to resize a panel group. This can make it easier to see more important panels. Click the Symbols panel tab and drag the dividing line between the Symbols panel group and the Stroke panel group down to resize the group.

Next you'll reorganize a panel group.

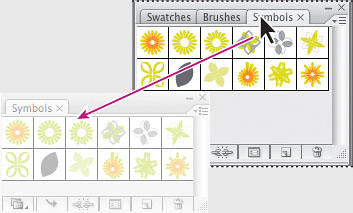
7. Drag the Symbols panel tab outside the group to remove the panel from the dock.

Drag the panel tab to separate from the group.

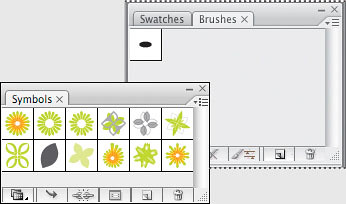
The result.

You can also move panels from one panel group to another to create custom panel groups of the panels you use most often. Next you'll organize the panels to create more space in your work area.

8. You can double-click the tab containing the name of the panel to reduce the size of the panel. Double-click the tab again to minimize the panel. This can also be done when a panel is docked.

Customizing your workspace

You can reset your panels and Tools panel to their default position. You can also save the position of panels and easily access them at any time by creating a workspace. Next you will create a workspace to access a group of commonly used panels.

1. To reset the workspace back to the default settings, choose Window > Workspace > [Basic].

Next you'll open some panels, align them on the side, and save the workspace.

2. Choose Window > Align and position the group of panels so that they are all visible on the left side of the screen, below the Tools panel.

3. Choose Window > Workspace > Save Workspace. The Save Workspace window opens. Enter the name Navigation, then click OK.

4. Return to the default panel layout by choosing Window > Workspace > [Basic]. Note that the panels return to their default positions. Toggle between the two workspaces using the Window > Workspace command and selecting the workspace you wish to use; return to the [Basic] workspace before going on to the next exercise.

Using panel menus

Most panels have a panel menu in the upper-right corner of the panel. Clicking this button () opens a menu with additional commands and options for the selected panel. You can use this to change options for the panel display or to access additional commands relating to the panel.
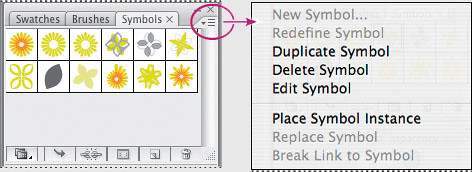
Next you will change the display of the Symbols panel.

1. Click the Symbols panel icon on the right side of the workspace. You can also choose Window > Symbols to display this panel.

2. Position the cursor on the panel menu () in the upper-right corner of the Symbols panel, and click to display the panel menu.

3. Choose Small List View from the panel menu. This shows the symbols as a list with a thumbnail, allowing for you to see the name of the symbol as well as the thumbnail. This command affects only the Symbols panel rows, not the other panels visible on the screen. The commands in the panel menu apply only to the active panel.

4. Click the Symbols panel menu, and choose Thumbnail View to return the symbols to their original view. Click the Symbols panel tab to hide it again.

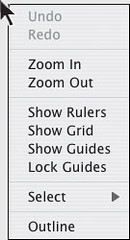
In addition to the panel menus, context-sensitive menus display commands relevant to the active tool, selection, or panel.

To display context-sensitive menus, position the pointer over the artwork, panel list, scrollbar, or Document magnification level. Then click with the right mouse button (Windows) or press Ctrl and hold down the mouse button (Mac OS).

Options for a context-sensitive menu.

AddThis Social Bookmark Button

The Adobe Illustrator CS3 Tools Part 1

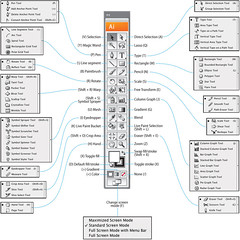
The Adobe Illustrator CS3 Tools panel contains selection tools, drawing and painting tools, editing tools, viewing tools, and the Fill and Stroke boxes. As you work through the lessons, you'll learn about each tool's specific function.

aitools

Click here to view full size.

1. Position the cursor over the Selection tool () in the Tools panel. Notice that the name and shortcut are displayed.
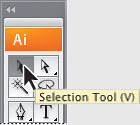
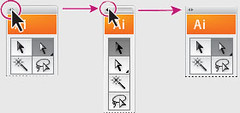
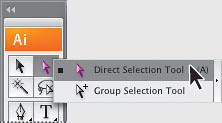
2. Position the cursor over the Direct Selection tool () and hold down the mouse button—additional Selection tools appear. Drag down and to the right, and release the mouse button over one of the additional tools to select it. Any tool in the Tools panel that displays a small black triangle at the bottom right corner contains additional tools that can be selected by clicking and holding down the tool.
Next you will focus on resizing and floating the Tools panel.

3. Select hidden tools using the following methods:

  • Click and hold the mouse button on a tool that has additional hidden tools. Then drag to the desired tool, and release the mouse button.
  • Hold down Alt (Windows) or Option (Mac OS), and click the tool in the Tools panel. Each click selects the next hidden tool in the hidden tool sequence.
  • Click and drag to the right of the hidden tools and release on the arrow. This tears off the tools from the Tools panel so that you can access them at all times.

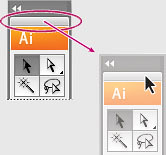
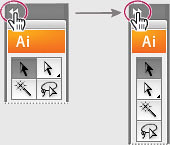
4. The Tools panel can be changed to either a one column or two column panel. Click the double arrow in the upper left corner of the Tools panel to contract to one column. Click the same double arrow to expand to two columns again. This can conserve screen space.

5. The Tools panel can also be removed from its position on the left side of the workspace. To move the Tools panel and float it in the workspace, click and drag it from the title bar above the Illustrator icon or the Illustrator icon into the workspace.

Click and drag to move the Tools panel.

The result.

6. When the Tools panel is free-floating, it can become one column. With the Tools panel floating, click the double arrow in the upper left corner at the top of the Tools panel. This will give you a one column Tools panel. Click again to turn the Tools panel back into two columns.

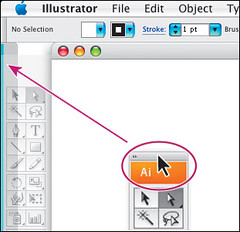
7. To dock the Tools panel again, click and drag from the light gray area or the AI logo area at the top of the Tools panel to the left side of the application window (Windows) or screen (Mac OS). A translucent area with a blue border to the left will appear. Let go of the Tools panel and it will fit neatly into the side of the workspace.

Click and drag to dock Tools panel.

The result.

AddThis Social Bookmark Button

Working with color groups and Live Color in Illustrator CS3

A color group is an organization tool that lets you group related color swatches together in the Swatches panel. In addition, a color group can be a container for color harmonies, which you create using the Live Color dialog box or the Color Guide panel. Next you will create a variation of the blue color.

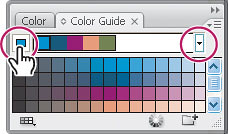
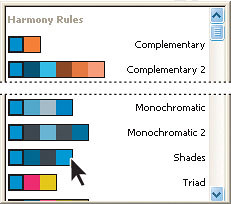
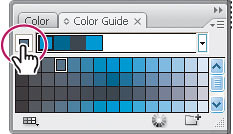
1. Choose Window > Color Guide. With the new shape still selected, and the fill box selected in the Tools panel, click the Set base color to the current color icon in the Color Guide panel. Choose the Shades category from the Harmony rules pop-up menu.

Click to set the base color

click to set the base color

Choose the Shades harmony rule.

Choose the Shades harmony rule

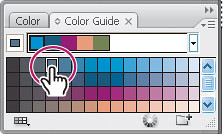
2. In the Color Guide panel, click a dark blue color from the top row of color shades. This should fill the new subtracted shape with the new color. Click the Set base color to the current color icon.

Choose a color.

Choose a color

Set the base color.

Set the base color

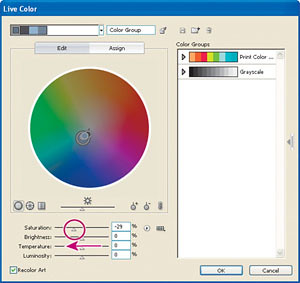
3. Click the Edit Colors button (Colors button ) at the bottom of the Color Guide panel. The Live Color dialog box will appear.
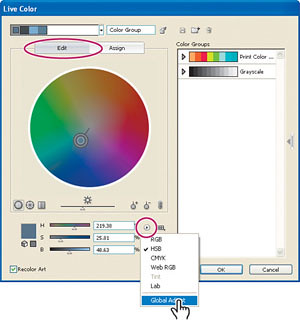
4. In the Live Color dialog box, click the Edit tab at the top. Click the Color Mode button and select Global Adjust from the menu. Move the Saturation slider to the left until the value in the field is -29%. Click OK.

5. Choose Select > Deselect.

Select Edit and Global Adjust.

Select Edit and Global Adjust

Desaturate the color.

Desaturate the color

Sorce : Adobe Illustrator CS3 Classroom in a Book

AddThis Social Bookmark Button