
9. Adjusting the Color of the Rough Text
Choose Image > Adjustments > Hue/Saturation (Ctrl+U) from the menu bar to open the Hue/Saturation dialog box. Click on the Colorize check box to select it, drag the three color sliders to the settings shown here, and then click on OK.
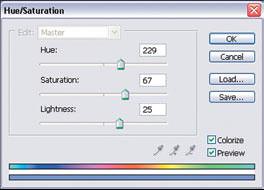

The black letters will take on a bluish tone. Click on the Add a Layer Style button on the Layers Palette, and then click on Blending Options. Choose Multiply from the Blend Mode drop-down list, and then click on OK.
10. Importing a Background Image
Choose File > Open (Ctrl+O), and open the file.

Choose Select > All (Ctrl+A) to select the entire image. Press Ctrl+C to copy the selection, and then close
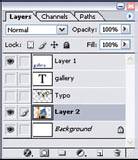
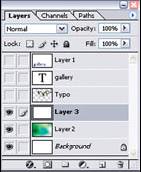
the file. Return to the image file you created for this project, and then press Ctrl+V to paste the copied image onto a new layer named Layer 2. In the Layers Palette, drag Layer 2 down and place it just above the Background layer. Click on the Layer Visibility icons next to the gallery layer and the Typo layer to hide them from sight.
Choose Edit > Transform > Rotate 90? CW to rotate the copied image. Choose Edit > Free Transform (Ctrl+T), drag the handles to resize the layer content to fill the image window, and then press Enter.
11. Blurring the Background Image and Changing Its Color
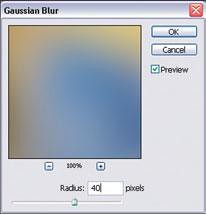
With the Layer 2 layer still selected in the Layers Palette, choose Filter > Blur > Gaussian Blur from the menu bar. In the Gaussian Blur dialog box, increase the Radius setting to 40, and then click on OK.
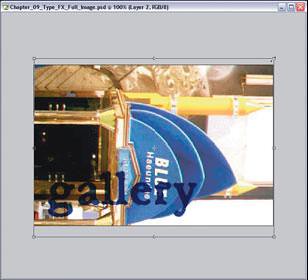
This will blur the image so only its original colors can be seen. Make the gallery and Typo layers visible and compare your screen to the figure.

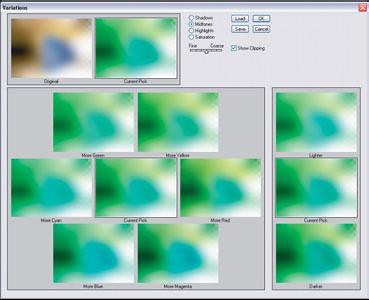
Choose Image > Adjustments > Variations to open the Variations dialog box. Click on the More Green and More Yellow thumbnails in the dialog box to add more greenish tones into the layer, and then click on OK.

12. Adding a White Layer
Click on the Create a New Layer button (Shift+Ctrl+N) in the Layers Palette to add a new layer named Layer 3. Leave it positioned above Layer 2. Set the foreground color to white and press Alt+Del to fill the new layer with white. Click on the Layer Visibility icon beside each of the layers above Layer 3 in the Layers Palette to hide it.


0 Comments:
Post a Comment